The Ultimate Guide to Minecraft Potions: Brewing Success
Minecraft's enchanting world extends beyond mining and crafting; it delves into the mystical realm of potion brewing. These magical concoctions can offer powerful buffs, crucial for survival and conquest. This comprehensive guide will walk you through the entire process, from gathering ingredients to brewing potent elixirs. Let's dive into the fascinating world of Minecraft potions!
1. Setting Up Your Brewing Station:
Before embarking on your potion-making journey, you'll need a few key items:
- Brewing Stand: This is the centerpiece of your potion-brewing operation. Craft it using 3 cobblestone and 3 blaze rods.
- Blaze Powder: Obtained by smelting blaze rods dropped by blazes found in the Nether. This fuels the brewing process.
- Bottles: Made by smelting glass, these are essential containers for your potions.
2. Gathering Your Ingredients:
The magic lies in the ingredients. Here are some of the most common and their effects:
- Water Bottles: These are your base ingredient, filling the brewing stand's slots.
- Nether Wart: Found in Nether fortresses, this is the core ingredient for most potions.
- Glowstone Dust: Increases the potion's duration.
- Redstone Dust: Turns a potion into a splash potion (affecting nearby entities).
- Sugar: Creates a swiftness potion (increased movement speed).
- Spider Eye: Turns a healing potion into a harming potion.
- Magma Cream: Creates a fire resistance potion.
- Fermented Spider Eye: Adds negative effects to potions (e.g., poison, weakness).
- Golden Carrot: Creates a night vision potion.
- Rabbit's Foot: Creates a jump boost potion.
- Ghasts Tears: Creates regeneration potions.
- Dragon's Breath: Adds lingering effects to potions.
3. The Brewing Process: A Step-by-Step Guide:
Here's how to brew your first potion:
- Place the Brewing Stand: Put your brewing stand down.
- Fuel the Stand: Place blaze powder in the fuel slot.
- Add Water Bottles: Place water bottles in the three slots on the top.
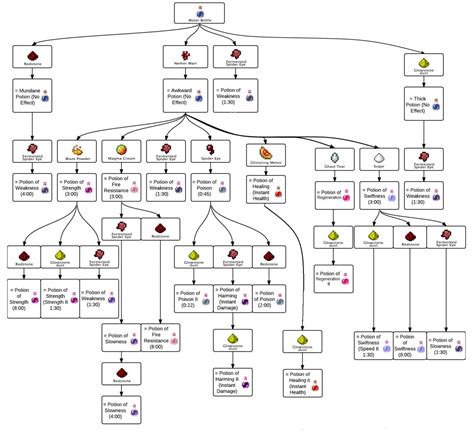
- Add Nether Wart: Add nether wart to start the brewing process. A "Awkward Potion" will result.
- Add Ingredients: Use additional ingredients to modify the Awkward Potion into the desired potion type. The order matters; experiment to discover the ideal combinations!
4. Potion Types and Their Uses:
Mastering potion brewing unlocks a wealth of benefits. Here are some powerful concoctions and their effects:
- Strength Potions: Increase attack damage.
- Speed Potions: Boost movement speed.
- Healing Potions: Restore health.
- Invisibility Potions: Hide from mobs and players.
- Night Vision Potions: See in the dark.
- Fire Resistance Potions: Protect against fire damage.
- Poison Potions: Inflict poison damage.
5. Advanced Potion Brewing:
Once you've mastered the basics, explore more advanced techniques:
- Splash Potions: Using redstone dust creates splash potions, affecting nearby creatures.
- Lingering Potions: Adding Dragon's Breath transforms splash potions into lingering potions that create an area of effect.
Conclusion:
Potion brewing in Minecraft is a rewarding skill that greatly enhances gameplay. By following this guide and experimenting with different ingredients, you'll create powerful elixirs that will aid your adventures. Remember to explore the possibilities; Minecraft's brewing system is deep and offers countless combinations. Happy brewing!